Friday, August 2, 2013

The Dress!

I absolutely love wedding dresses!  I was so excited to do as much dress shopping as possible and boy was it fun.  While visiting my future in-laws who live in Fresno, CA I brought it up to my fiancé's mother that we go look at some dresses.  I was so excited that she was up for it!  We went to a few different places and I got to try on different styles and found that I like lace and belts!  Like these ones:


Next it was time to set up appointments at home and I knew that I had a few family members who would want to come along.  I was the first in the family to have a wedding since probably 1990, so they were excited.  We tried David's Bridal because their website is awesome, and I knew every dress.  Unfortunately we did not have the best experience.  They hardly had anything in my size to try on and the girl helping us kept calling the train of the dress a "tail."  I am not an animal.  Plus, they make you ring a big bell for everyone in the store to see when you choose your dress.  That alone made me not want to buy my dress there.  It just didn't work out, but my aunts and close friends got to see me in some dresses.

The following day, I was a bit smarter and had just my mother and future mother in law come with me to a bridal boutique in Costa Mesa, CA called Mon Ami Bridal Salon.  While the dresses there were not as "cost effective" as say David's Bridal, they were having a trunk show for the English designer Augusta Jones.  She has beautiful soft designs with lace accents, and such romantic touches.  I really lucked out!  After trying on a few dresses, I was put in her "Juno" dress.  It is a gorgeous A-line dress, with layers of lace, a sweetheart neckline, and a beautiful belt.  This was my dress!  I loved the way it made me feel, and the way it made me look.  It was perfect for my summer, garden wedding by the beach.

Here is the dress on a model.  I planned to wear a slip underneath to make the skirt fuller.

Trunk shows are the best!  Because of that, I got a discount on the dress, and they added covered buttons on the back for free!  I also splurged and had a custom veil made to match the lace on the dress.  Here are some pictures of the dress from the day I chose it.  Mind you, this is all that I had to look at for five months until the dress showed up!


It is hard to have only a few pictures from the time you order your dress and the months that it takes to arrive.  But, it was worth the wait because I liked the dress on myself better than on the model on her website.  

Here she is on the day of the wedding!


With the lace detail that is matched in my veil.


Thanks for reading!

Love, Jen

Thursday, April 4, 2013

DIY Wedding Date


While browsing through Pinterest, I noticed a new way to display and show off my wedding date.  I took that idea and decided to make it my own with materials that I was a bit more used to.

This is a super easy project with some very cute results!

Basically the idea is to put the wedding date in wooden numbers in a picture frame without the glass.
The materials for this project are:

IKEA Frame RIBBA (without the glass)
Wooden numbers for the date (the ones from Jo-Ann's fit perfectly)
Decorative Scrapbook Paper or Fabric for the background
Acrylic Paint
Paint brush
Scissors
Hot Glue Gun, or other liquid adhesive (just make sure it's stronger than Elmer's)
Pencil


The first thing that I thought of as a former college student was the pictures frames with matting that opened up for 3 pictures.  The frames come in three different colors; black, white, and a dark gray.  I happened to have an extra black one because the glass had broken which was perfect for this project!  (Even though my wedding colors are pink, white, and gray, I figured that this one could go in our apartment after the wedding.)


The next step was to get the wooden letters which are easy to get from Jo-Ann Fabrics.  While at Jo-Ann's I found a blue damask fabric that was on sale.


If you plan to use scrapbook paper, you will need at least 2 pages of the large squares. 

I figured that a nice yellow would go well with the fabric so I chose "Butter Cream" to paint the numbers.  Because it is a lighter color I did two coats.

Make sure to paint the numbers first because they take a while to dry.

Next it was time to start on the background for the date.  If you are using scrapbook paper, measure the paper slightly bigger than the openings of the matting and tape each one to the back of the matting.

If you are using fabric like me, the first step is to check the fabric and see which way you want it to go behind the matting.  I did this by simply placing the matting on top of the fabric.


Once you have chosen the look that you want, place the fabric on a table, pretty side down.

Then, place the cardboard backing of the frame on top and trace it with a pencil.


Simply cut out the piece and if you are using fabric like me, iron out any wrinkles. The end result should look like this.


 I tested to make sure that it looked good still under the matting.


Now it is time to mat the fabric onto the cardboard.  Because I was using a cheep hot glue gun, I knew that I had to work fast.  I started at one end and then a little at a time, glued the fabric down along the edges.  Make sure to stay along the edges only because they will be covered by the matting.


Like I said this stuff dries fast! So, when it is done the backing is already ready to be handled.  Simply put the matting, background and frame back together.


By this time I was able to check the numbers which were still a little tacky...  So I waited...

Finally they were dry enough and I could position them onto the frame.


It looks the same once glued down, but remember to do it quick and only after you are happy with the look.  

At this point, it looks cute and could be done, but I think it needs a little more.  I just added a little heart between each group of numbers.  This breaks them up and makes the frame look more like a date.  

Here's the finished product!


Here it is again with a better background.


This is another one that I made for a friend getting married this June.  Her colors are Green, Gray, and White.  I used scrapbook paper for hers but pretty much the same everything else.


I hope you like it!  This was my first attempt at a pictured tutorial so please be kind.  Let me know if you have any questions, and ENJOY!


Tuesday, April 2, 2013

Bridesmaid Dresses

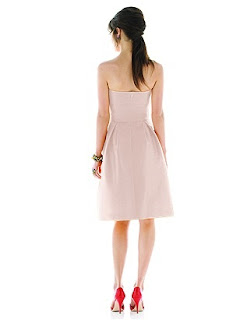
I am going to be honest with you, I had a harder time picking out my bridesmaid dresses, than I did with my own wedding dress!  I scoured the internet for the perfect dresses and was given plenty of suggestions from my maids.  I would have loved to be one of those brides who could give her maids a color and then let them pick whatever dress they wanted.  I could not.  I had a hard time even giving them a choice of four different dresses.  Luckily The Dessy Group has dresses that come in so many colors. I found a color that I liked, "Pearl Pink" which came in many different styles.  They also have many dresses with the same skirt with different tops.


I narrowed my choices down to the Alfred Sung collection from  The Dessy Group.  My color was going to be Pearl Pink which came in the Dupioni fabric.  From there, I found a really cute pleated skirt with five different top options.  


After even more deliberation and input from my bridesmaids, I finally decided on strapless for my three bridesmaids

 and the bateau neckline with scoop back for my sister who is the maid of honor.  


I was so excited to finally choose the right dresses for my bridesmaids and could not wait to see them all come together!

Here they are on the big day!

From being a bridesmaid myself, I knew that they would be standing a lot, so I wanted to give them a pair of shoes that would not be too uncomfortable.  I had chosen a pair for myself from Nordstrom's with a low heal, and found a cheaper version that are very similar at DSW.

Lastly, my neighbor went to a sale at the Children's Place and found matching dresses for the flower girls!  They are slightly different because one is toddler sized and the other is a child size.  I am also so glad that she was able to find them there on sale because from what I've found, once a child's dress turns white, the price doubles.  These are perfect for my soft, summer wedding!

It is so exciting to get big details accomplished for the wedding!  After choosing the bridesmaid dresses, I found that The Dessy Group has ties for adults and children in the exact same color and fabric as what I chose.  I was able to buy matching ties for all of the groomsmen, the fathers, and little bow ties for the ring bearers!

Hope you enjoyed!


Engagement Pictures

I was so absolutely excited to take engagement pictures.  This was going to be the first time that my fiancé, Ted and I would be taking professional pictures together.  I loved prepping for the shoot!  

We were so incredibly lucky to have my future in-laws book the Fresno, CA based photographer, Mario Friginal who is so incredibly talented!  He has some gorgeous photos and came with rave reviews.  I really suggest that you check him out, especially if you are in the Central California area.

So many details go into wedding planning, and engagement pictures are no exception.  I wanted to look as pretty as possible, who wouldn't?  Like I said, my future mother-in-law booked an amazing photographer and set a date, so the biggest part was a go.  Next, I had to pick out what to wear.  My fiancé was easy, kakis and a soft colored button up shirt.  For myself, I had to work a little harder.  

From previous photo sessions I had learned that in taking portraits, you should wear solid colors.  Stay away from prints, big stripes, polka-dots, etc.   They distract the eye and cause people to look at your clothing instead of your beautiful face!  As the bride, I knew that it was my only time to legitimately wear a lot of white.  

So, I went to Macy's and found a beautiful lace dress in cream.  

I also remembered that I had a top in my closet with a similar pattern and material from Forever21.  It hadn't fit for a while, but with my efforts to lose weight for the wedding, it fit again!  
I paired that top with a pair of dark jeans and had two outfits to wear for the pictures!

In the previous post, I told you about my Engagement Picture Props so that detail was ready to go as well! 

Because my fiancé and I both lived in Southern California, we entrusted his parents who live in Fresno, CA to book a few other appointments.  We had a hair appointment that morning at a local salon, and then I had my make-up done at the Clinique counter in Macy's at the RiverPark Shopping Center.  It was very easy, and like a simple version of getting ready for a high school dance.  I had my hair straightened with big curls, and natural looking make-up.

Okay, now it was time to meet up with Mario Friginal.  He knew of a place with beautiful scenery including Cherry Blossoms which I had requested.  

I started out with my hair down, in the white dress and Ted in a light pink shirt.  We walked around the trees with beautiful pink blossoms and these are the results!


 We decided to use this one for our Save the Dates!

We took a lot of pictures around the pink blossoms and then decided to change and try a few different places!  I then changed into the top and jeans, and Ted put on a light blue shirt and jeans as well.  We walked across the street and found another beautiful background!  Here are the results!


Along with the Engagement Picture Props that I made, we brought along a journal that Ted had made for me as a Christmas gift.  

Finally, Mario Friginal had one last location that he had always wanted to shoot at.  It was a fruit stand that was closed for the winter.  We got some very cute pictures including this one:

These are only a few of the pictures that we took.  We chose many more to print and use at the wedding.  I figured a fun way to fill space on the guest tables would be to put a framed picture on each table.   (We'll get to the rest of my table ideas later!)

Thanks for checking out my engagement pictures!  I hope you enjoy them, and that they might help you in finding a good way to plan yours!